
Setting Up the Active Directory Certification Authority
Overview
To enable passwordless login via virtual smart cards, a certificate issued by a trusted Certification Authority (CA) is required. In a Windows domain environment, this role is typically performed by the Active Directory Certification Authority. Setting up the CA ensures that each user's virtual smart card is associated with a valid certificate that can be used for secure authentication during workstation login. This step is essential for establishing trust between the workstation, the user’s smart card credentials, and the domain controller.
Preconditions
Before you configure the certificate template for passwordless login using virtual smart cards, ensure the following prerequisites are met:
Active Directory Certificate Services (AD CS) is installed and configured.
The Certification Authority (CA) role must be installed on your server.
The CA must be configured as an Enterprise CA. Standalone CA is not supported for smart card logon.
You are logged in as a Domain Administrator or equivalent.
The account must have permissions to manage certificate templates and issue new ones.
Setting Up the Active Directory Certification Authority
Sign in to the Certification Authority (CA) server using a Domain Administrator account.
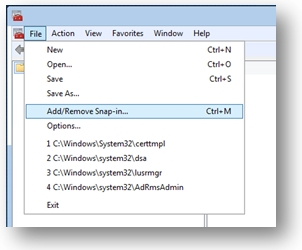
Launch MMC (
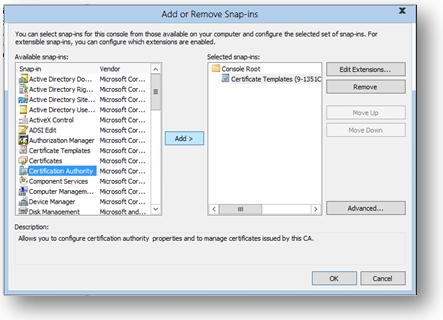
mmc.exe) via Run or Start Menu.Go to File → Add/Remove Snap-in → add Certificate Templates.
In the available snap-ins list, click Certificate Templates, and then click Add.
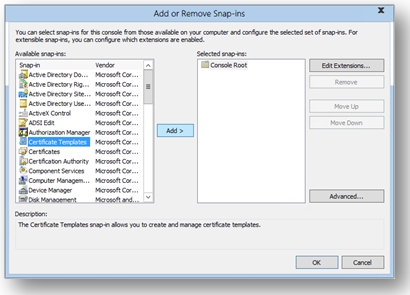
Certificate Templates is now located under Console Root in the MMC. Double-click it to view all the available certificate templates.
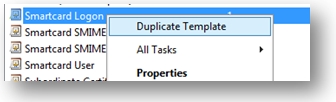
Right-click the Smartcard Logon template, and click Duplicate Template.
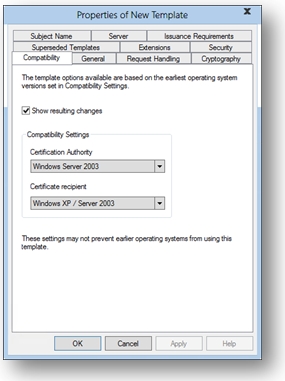
On the Compatibility tab, under Certification Authority, review the selection, and change it if needed.
On the General tab:
Specify a name, such as TPM Virtual Smart Card Logon.
Set the validity period to the desired value.
On the Request Handling tab:
Set the Purpose to Signature and smartcard logon.
Click Prompt the user during enrollment.
On the Cryptography tab:
Set the minimum key size to 2048.
Click Requests must use one of the following providers, and then select Microsoft Base Smart Card Crypto Provider.
On the Security tab, add the security group that you want to give Enroll access to. For example, if you want to give access to all users, select the Authenticated users group, and then select Enroll permissions for them.
Click OK to finalize your changes and create the new template. Your new template should now appear in the list of Certificate Templates.
Select File, then click Add/Remove Snap-in to add the Certification Authority snap-in to your MMC console. When asked which computer you want to manage, select the computer on which the CA is located, probably Local Computer.
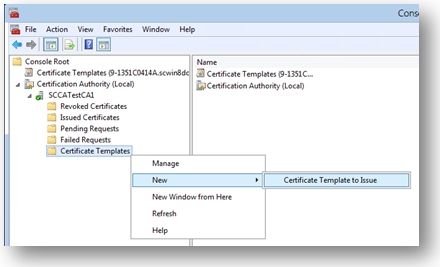
In the left pane of the MMC, expand Certification Authority (Local), and then expand your CA within the Certification Authority list.
Right-click Certificate Templates, click New, and then click Certificate Template to Issue.
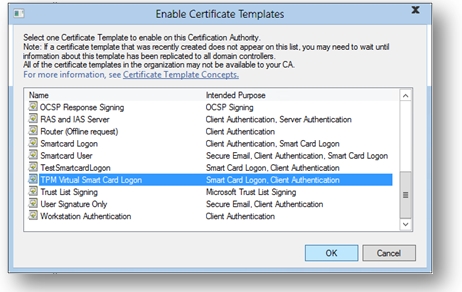
From the list, select the new template that you just created (TPM Virtual Smart Card Logon), and then click OK. Note: It can take some time for your template to replicate to all servers and become available in this list.
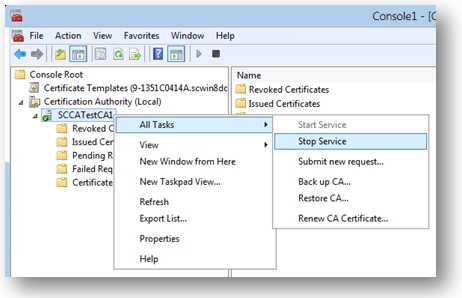
After the template replicates, in the MMC, right-click in the Certification Authority list, click All Tasks, and then click Stop Service. Then, right-click the name of the CA again, click All Tasks, and then click Start Service.
Last updated